Setting Missing/Invalid Barcode Behavior
The Barcode data formulas that you create may generate data that is invalid for the current Barcode Type, or completely blank data. Depending on your purposes, you can set OnMerge Barcodes' behavior when it tries to merge a missing or invalid barcode.
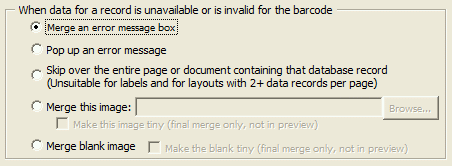
Click the Merge Options tab in an image's OnMerge Barcodes dialog to access the unavailable-missng data action frame. Select one of the buttons to indicate what should happen when the result of the barcode data formula is blank or is otherwise invalid for the current Barcode Type.

Merge an error message box causes an error message like
this  to
be shown instead of the missing image.
Popup up an error message causes a dialog box to pop up with details about the invalid data. If you choose to ignore the error, a red "X" icon will be displayed in the image's place.
Skip over that database record entirely cancels the merge for that record (row) of the data source and causes the merge process to move on to the next record.
Merge this image lets you specify one fixed image to use instead of a barcode with invalid data. When this option is selected, you can enter a file name, or you can press the Browse button to select the file from a list. The Make this image tiny option is available when Merge this image is selected.
When the Make this image tiny checkbox is NOT checked, the missing/invalid image will be resized to fit within the barcode's normal size as described in the Sizing an OnMerge Barcode topic. If the missing-invalid image itself is missing, OnMerge Barcodes will merge Word's red "X" missing-file icon instead.
When the Make this image tiny checkbox IS checked, the missing-invalid image or "X" icon will be made very small. The exact size of the image shown depends on several factors, but smaller-sized original image files usually shrink down to 1/72" (0.35 mm) square -- roughly the size of the period at the end of this line. Larger image files typically do not shrink to such a small size: expect their "tiny" versions to have a more noticeable size.
The result of selecting Make this image tiny will show up in final merges only. Word's on-screen preview will not make preview images tiny because they'd be too small to select and edit.
Merge blank image will make OnMerge replace barcodes with invalid data with a blank image. The Make blank tiny option is available when Merge blank image is selected; it works just like the Make this image tiny option of Merge this image, above. Again, the result of selecting Make blank tiny will show up in final merges only. Word's on-screen preview will not make preview images tiny because they'd be too small to select and edit.
Merge blank image with the Make blank tiny option is the closest OnMerge can come to making an invalid barcode completely disappear without taking up any space: it is invisible except for adding a tiny, hard-to-notice blank space to your layout.
Setting the Empty-Record Behavior
If a barcode data formula contains one or more database field lookups, all of the referenced database fields for some records may be completely empty or blank. You may also see some phantom empty "records" beyond the end of the database on the last page of a series of labels. The missing fields may cause the barcode data to be invalid or blank, in which case OnMerge Barcodes will fall back to the behavior that the "unavailable or invalid" option specifies.
The regular "unavailable or invalid" option is fine for many applications, but some applications require one kind of action for truly missing or invalid barcode data but need a blank in the case where all referenced fields in the database record are empty/blank.
NB when you're printing several records per page — for example a 2 x 4 page of name badges — you'll usually have one or more excess blank badges at the end of the last page. Those excess badges correspond to non-existent records beyond the end of data, but Word will nonetheless try to merge each excess badge with a fictional blank data record. That can look messy. Use the Merge Blank Image option to blank out the barcode for exess badges.
Click the Merge Options tab in an image's OnMerge Barcodes dialog to access the empty-database action frame. Select one of the buttons to indicate what should happen only in the case where all the database fields in the file name formula are empty/blank for a given record.

Merge as usual causes missing-image to go on as usual as described above.
Merge blank image will make OnMerge use a blank for a given record when ALL the database and address fields in the file name formula are blank or missing. This will occur even if the barcode data formula is a mix of database/address and other types of fields. The Make blank tiny option is available when Merge blank image is selected; it works just like the Make this image tiny option described above. Again, the result of selecting Make blank tiny will show up in final merges only. Word's on-screen preview will not make preview images tiny because they'd be too small to select and edit.
Merge blank image with the Make blank tiny option is the closest OnMerge can come to making a missing barcode completely disappear without taking up any space: it is invisible except for adding a tiny, hard-to-notice blank space to your layout.